One of the biggest issues I hear with projects I’m sent to mix is less than ideally recorded instruments or voices. You don’t need expensive equipment to record your music well but you do need to work at recording the sound you want to hear in the final mix from the start.
Here are some thoughts I’ve gathered about recording instruments and voices well over the years:
Sonic Imagining
It can be temping (and I’ve done it) to record like this. “Okay, guys we’ve got a rock song. Let’s record drums, bass, stereo guitars, solo guitar, lead vocal, doubles, backing vocals oh, and is that a keyboard player you have there? Don’t worry we’ll fit him in somewhere …”
Hey, that will probably work and I’m not asking you to take weeks pontificating about how to record every instrument but I want you to use some imagination.
Before you record a part, get a sonic picture of the sound you want to capture in your mind both the macro picture of the whole mix and then the individual instruments . Maybe you’re thinking of another song. Maybe it’s a sonic “feeling” you’re going for. But at least spend a little time before you set up a mic or plug in a cable thinking about each sound AND how they should interlock.
I don’t want to stray too much into arrangement territory (that’s a separate blog post) but the takeaway is this: record the sound you want to hear at the start that you want to hear at the end.
Recording Level: The Goldilocks Zone
Whether you’re recording a voice, guitar, a synth or a jaw harp, getting the right amount of level is imperative to capture a healthy signal that you can work with in a mix. Some problems I often hear:
Too Much Gain
This results in clipping which can work in some genres but it should be intentional and not accidental (which it is 99% of the time). This will make instruments and voices sound harsh especially when you start to add them into a mix. Good clean takes is ideal and then we can add some grit in the mix if it needs it.
Too Little Gain
This results in a noisy or fuzzy mix because you need to gain up each track so you can work with them. This will degrade the clarity of the mix.
I’ve actually had a client who went away and recorded most of the songs on an acoustic album again because his original takes were too quiet. Before he did, I made a test mix/master for him to show him how it would sound and he could immediately hear the undesireable grain and loss of clarity.
Just Right: The Goldilocks Zone
When you’re recording at 24-bits (which you should be) you want to average -20dBFS with peaks no higher than -10dBFS at the most. Why? This is the ideal level for most modern audio interfaces at this bit rate so that you have plenty of headroom.
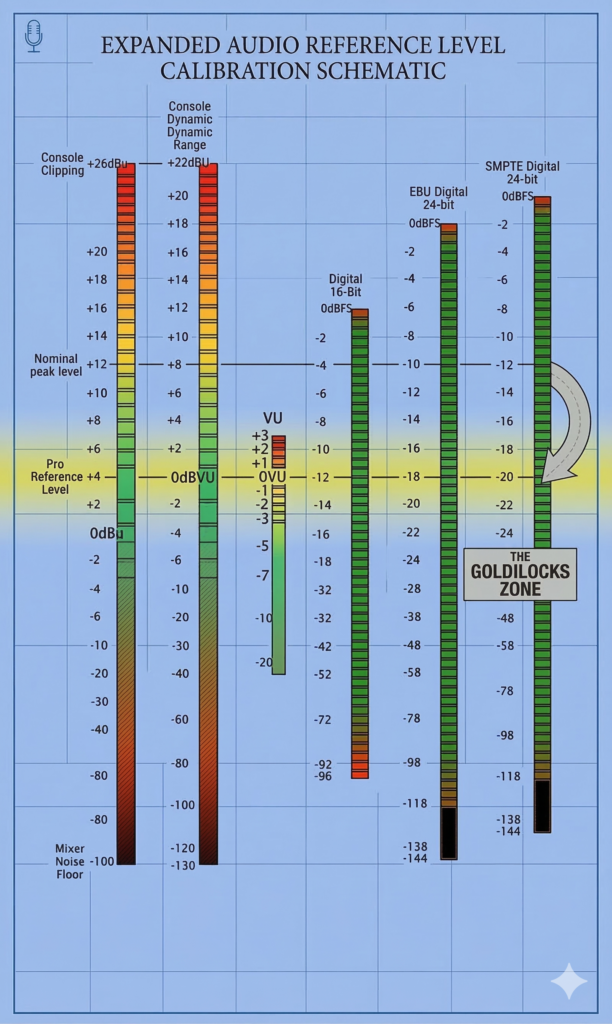
This image was adapted from Zed Brookes excellent image from his article on recording at the optimum level for your DAW. Definitely take a look if you want to dig in deeper.
Microphone Placement & Orientation
There’s lots of advice out on the YouTubes and Instagum from people who have more followers than experience recording music so be careful who you take advice from when it comes to mic placement. I recommend this Apogee recording tutorials playlist
Here’s a simple trick to get good mic placement – use your ears. I’m not being cute. If you’re recording a drum kit, place the mics where you think they should go, record 16 bars playing around the kit from loud to soft and then listen back. Does it sound good? How is the balance of the whole the kit?
If something doesn’t sound right, move some mic and try again. Same goes for a single mic’d instrument or voice, record something, listen back, if it doesn’t sound right, change the mic position or axis.
Chasing The Flame
There is a great and quirky book by Michael Stavrou called “Mixing With Your Mind“. In it Michael talks about “chasing the flame” of the sound and it makes sense. The general gist is that when moving away from an instrument of voice there is a point where the sound will coalesce into a balanced “flame tip”. This is where you want to place your mic.
Move The Mic to EQ the Sound
If something is too bright, change the mics axis. Don’t point it straight at a sound source like a torch, try angling to get a better sound. That applies to vocals too.
If you’re recording yourself, wear a good pair of closed-back headphones. Move the mic an inch at a time while humming or strumming and listen for where the ‘body’ of the instrument lives. If it sounds ‘boomy,’ pull back; if it sounds ‘thin,’ move closer.”
As you record, don’t EQ and compress, keep those raw tracks and balance them using volume alone. The better that mix sounds raw the more cohesive and less finagling you’ll need to do in the mix stage.
Impeccable Sound Design FTW
If you think this only applies to acoustic instruments, it doesn’t. If you’re writing electronic music, work on your sound design to create parts that lock together from a frequency perspective. Use the same method of turning up channels without any effects (maybe delay/reverb if that’s part of the sound) and get a balanced mix. If it locks together you’re on the right track.
Bonus Tip: Double-Tracked Vocals VS Copying
This sort of fits into part 3 about arrangement but I’m going to mention it here. I often get projects where a client has copied over the same take and assumes that this is what aa “double-take” of a vocal part is.
Unfortunately this isn’t what double-tracked vocals are. Double-tracked vocals are very accurately recorded doubles of the lead or harmony vocals. They are each separate takes on separate tracks which are then blended in with the lead or harmony vocals to create a thicker lead vocal sound.
Sometimes they are mixed up so they are more obvious, sometimes they are blended in more subtly. The key is to record a separate take that is very close to the original in regards to pitch and timing. The more accurate your double the more polished mix you can achieve.
Summing Up
Hopefully you can see the importance of capturing the source sounds of a mix well. As I mentioned, if you can create a rough mix balance of the raw sounds (as described in part 1) and the mix hangs together nicely and has a vibe, you can bet that the final mix will only enhance that foundation even more.
In the next part of this series I talk about what I feel really separates a good mix from an excellent mix. We’re going to talk about arrangement.


0 Comments